woensdag 27 juli 2011

Sepia, with only one pencil...

Hello everybody!

How are you all? I'm back with a card for the Derwent-challenge
It has been two weeks, so time for the next one.
This time we want you to make a card or project, on which your stamp has to be colored with only 1 pencil.
This it quite a challenge, but so fun to do! 


I decoraded my card with some flowers, leaves and pearls.


The little rose sits on my stamp.


And to color this Hänglar & Stänglar girl I only used pencil 530.


On the back my personal stamp, surrounded with a stamp from Stempelglede. 
(Such a beautiful combination, in my opinion.)


On the inside I stamped a sentiment from Scrapmagasinet on handmade paper. 
It says "only for you, because it's your birthday".


And I wanted to tell you that, when I prepare my card I always stamp on a piece of plain paper. 
I color that stamp in and match it with my designpapers. I can play with shadowing etc.  
Here is an exemple of that "experimental stamp".

If you also color with Derwent softcolor pencils, join us in the challenges here on the Derwent-blog
Hope to see you soon again!

vrijdag 22 juli 2011

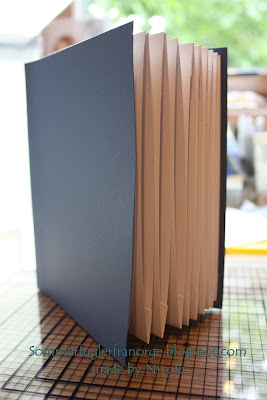
Filefolderbook (with tutorial)


Hi scrappers!

A little while ago I made this filefolderbook for my neighbour. She turned 70, so I wanted to make something special for her. Browsing on the internet I saw 3 pictures of this book and I started crafting. Because I liked it so much, I decided to make a tutorial for you all.


   Start with an A4 – cardstock and cut at 21 x 28 cm. 
Score at 14 cm at the short side (therefore in the middle) 
and at 2 cm at both the long sides. 
On the longer sides, cut half of the scored lines opposite of each other.


Apply tape on the remainder at the long sides


Cut afterwards a corner.
Glue the page together.


Make as many pages as you need following the above (I made 10 pages).
Apply tape at the closed longest side of your pages, except for 1.
Glue the pages together, the inside of your book is ready.


Cut a cardstock at 30 x 18 cm.
Score at 14,5 cm on both short sides, this is the book cover.


Glue the pages between the book cover with wide sticky tape.


I cut out some tabs with my Silhouette.


Glue the pages together with some sticky tape.


You can attach the tabs on the glued area on the pages.


Create a lock by using some ribbon or Velcro.


Attach the other ends of the lock on the backcover.


Cover up with cardstock and designpapers. 
Now decorate your book and enjoy! 


I colored my Tilda with my Copics:

skin: E50/51/53/93
hair: E31/33/35
shoes: B91/93/95 and 100
dress: R81/83
apron: R83/85
butterfly: Y32/B91/E35
shadow: W2
blender


A little bouquet of flowers and a dragonfly-charm.


and some droplets to embellish. 

I hope you enjoyed this little tutorial. If you made one, let me know, I would love to hear from you.


For the record, this wasn't my idea. I just made this after have seen a few pictures on the web. So if anyone needs to feel they have to claim it as their own, please let me know and I will give you credit for your design.

woensdag 20 juli 2011

Julehilsen..... at Christmas Challenges {with sketches}


Hi!

Here is my next Christmas card. I made it for the Christmas Challenge {with sketches} challengeblog as an inspiration to you all.


Carol made the sketch this time. And to be honest I found it a real challenge. Couldn't find the right papers and every time I draw a triangle, it wasn't the right size. But I did it and I have to say, I love my card now!


In the end I used Bo Bunny design paper and a sentiment from North Star Stamps. 
This Tilda was colored with my Derwent Colorsoft pencils:

skin: 170-190-620
hair: 570-560-580
dress: 310-350
wings: 360
ribbon: 580
star: 160

Our sponsor for these two weeks is: 


So take a look at Christmas Challenges {with sketches}, there you can see what you can win. 
And you get much more inspiration from the DT-members. 
Hope to see you there with your version of Carol's sketch!

zondag 17 juli 2011

I won!!

I have some great news to share. I won this beautiful book...


...by just giving a comment on the Pagemaps blog. Isn't that great!
Thanks Becky, for giving away this beautiful book. 
I'm walking on clouds right now 
(and we have plenty, the rain is pouring down at the moment)
and there is a big smile on my face! 
Can't wait to get more ideas for cards and stuff.

Have a great Sunday (like me)!


woensdag 13 juli 2011

Liefs


Hi everybody!

I have made a new card for the Derwent-challengeblog. This time you need to make a summerly card for us. Well, this is my version of summer.


Red, white and yellow flowers from my stash and I cut the leaves with my Silhouette out of kraftpaper. Then I painted them green in 2 layers, a lightgreen and a darkergreen.


On the top I added a butterfly, also cut out with my Sil. To highlight it some more I covered it with glossy accent. 

-
This Hänglar-Stänglar girl was of course colored with my Derwent colorsoft pencils:

skin: 170-190-620
hair: 550-620-610
clothes: 010-400-040-130
shoes: 400-610
plant trough with the plants: 490-490-400-130


The back of the card was lightly decoraded with a piece of designpaper from DCWV, one branche of leaves and of course my personal stamp.

I hope you hop on over to the Derwent-challengeblog and let yourself get inspired by all the beautiful creations of my DT-colleagues. And of course join in on the fun!!


woensdag 6 juli 2011

Happy Holidays....... at Christmas Challenges {with sketches}


Hi everybody!

The next challenge today at Christmas challenges {with sketches}. Renata has made a beautiful sketch for us all to work with. And this is my card with that sketch. Thanks Renata, it was a great one to work with. I enjoyed it. 


I used a package of papers, I got in the mail some time ago. I am not sure who the producer is. 
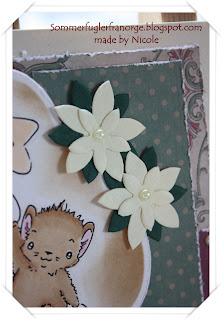
The flowers are from Petaloo. I did change the heart of the flower, because it was shiny orange and I didn't like it. But now it is how I like it, with an off white pearl.


This cutie is a freebie from Sliekjes Stamps and you can find it here
I colored this star mouse with my copics: 
E31, E33, E35, R81, E51, E53


Because I thought the cream cardstock was a bit dull, I stamped with a backgroundstamp little dots on it. 


And with a rubbon from Bo Bunny, my card was finished. 

So now it is your turn, hop on over to the challenge blog and deliver your Christmas card. You can find much more inspiration there from my DT-colleagues. And you can read all about the nice price you can win, sponsored by 


Hope to see you there!

Related Posts Plugin for WordPress, Blogger...