Posts tonen met het label tutorial. Alle posts tonen

vrijdag 25 mei 2012

Treats...


Hi everybody!

A little while ago I made these treats for my daughters birthdayparty. She gave them to her guests after the party as a little thank you. 

I made a photo-tutorial for you. It's very easy and I think the pictures tell it all. 

14 x 14 cm.


At this point you fill your box with some goodies and tie it with a nice ribbon.
I didn't glue it by the way :o)


Try it sometimes. And if you have any questions please let me know!

Bye bye :o)


vrijdag 22 juli 2011

Filefolderbook (with tutorial)


Hi scrappers!

A little while ago I made this filefolderbook for my neighbour. She turned 70, so I wanted to make something special for her. Browsing on the internet I saw 3 pictures of this book and I started crafting. Because I liked it so much, I decided to make a tutorial for you all.


   Start with an A4 – cardstock and cut at 21 x 28 cm. 
Score at 14 cm at the short side (therefore in the middle) 
and at 2 cm at both the long sides. 
On the longer sides, cut half of the scored lines opposite of each other.


Apply tape on the remainder at the long sides


Cut afterwards a corner.
Glue the page together.


Make as many pages as you need following the above (I made 10 pages).
Apply tape at the closed longest side of your pages, except for 1.
Glue the pages together, the inside of your book is ready.


Cut a cardstock at 30 x 18 cm.
Score at 14,5 cm on both short sides, this is the book cover.


Glue the pages between the book cover with wide sticky tape.


I cut out some tabs with my Silhouette.


Glue the pages together with some sticky tape.


You can attach the tabs on the glued area on the pages.


Create a lock by using some ribbon or Velcro.


Attach the other ends of the lock on the backcover.


Cover up with cardstock and designpapers. 
Now decorate your book and enjoy! 


I colored my Tilda with my Copics:

skin: E50/51/53/93
hair: E31/33/35
shoes: B91/93/95 and 100
dress: R81/83
apron: R83/85
butterfly: Y32/B91/E35
shadow: W2
blender


A little bouquet of flowers and a dragonfly-charm.


and some droplets to embellish. 

I hope you enjoyed this little tutorial. If you made one, let me know, I would love to hear from you.


For the record, this wasn't my idea. I just made this after have seen a few pictures on the web. So if anyone needs to feel they have to claim it as their own, please let me know and I will give you credit for your design.

zaterdag 31 oktober 2009

Netjes aangekleed

Weer eens iets leuks uitgeprobeerd bij een treff bij Joruns hobbyhjørne, het aankleden van een stempelafdrukje.

Again tried something new at a scrapevening at Joruns hobbyhjørne, dressing a stamp.


Je stempelt het meisje op aquarelpapier en nogmaals op designpapier. Het truitje en de broek knip je heel nauwkeurig uit en plakt dit netjes op het stempelafdrukje. Dan alleen nog de rest inkleuren en klaar is kees!

First you stamp the girl on watercolorpaper and one time at designpaper. The sweater and pants must be clipped very precise so you can glue this on the stamped girl. Color in the rest of the stamp, her hair, face and shoes and voilà you're ready!


Omdat ik de aandacht op het aangeklede meisje wilde vestigen, heb ik niet zoveel embellishments gebruikt. Alleen deze kleine charm, 2 bloemen en wat scrappersfloss om het plaatje "vast te houden".

Because I wanted the attention to go to the dressed girl, I didn't use so much embellishments. Only this little charm, 2 flowers and some scrappersfloss "to hold" her picture.


En dit is dan het eindresultaat. Leuk geworden toch?!

And her the final result. Isn't it nice?!

maandag 22 december 2008

Kerstkaartje met DVD-tje


Voor de naaste familieleden heb ik een speciale kerstkaart gemaakt. Er zat een kleine DVD in (doorsnee 8cm) met wat foto's van ons in onze nieuwe leefomgeving. Misschien vind je het leuk om ook een keer een dergelijke kaart te maken. Volgt hier een kleine workshop.
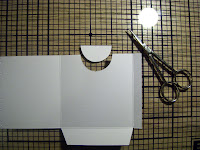
Snijd een (wit) cardstock van 27 cm x 10,5 cm.


Bewerk één kant met bijv. de cuttlebug, de voorkant van de kaart.


Rillen van rechts naar links (bewerkte kant ligt recht) op 8,5 cm / 17,1 cm / 25,5 cm aan de korte kant. Een laatste ril aan de lange kant (bewerkte kant ligt bovenaan) op 2 cm.


Snijd de delen weg zoals op de foto


Vouwen op de rillijnen


Maak in het rechtse deel een uitsparing voor de DVD


Lijm het rechtse deel tegen het middelste deel


En je kaartje is klaar en kan het aankleden beginnen


Dit kan natuurlijk ook met een reguliere grootte DVD.

Veel plezier
Related Posts Plugin for WordPress, Blogger...